

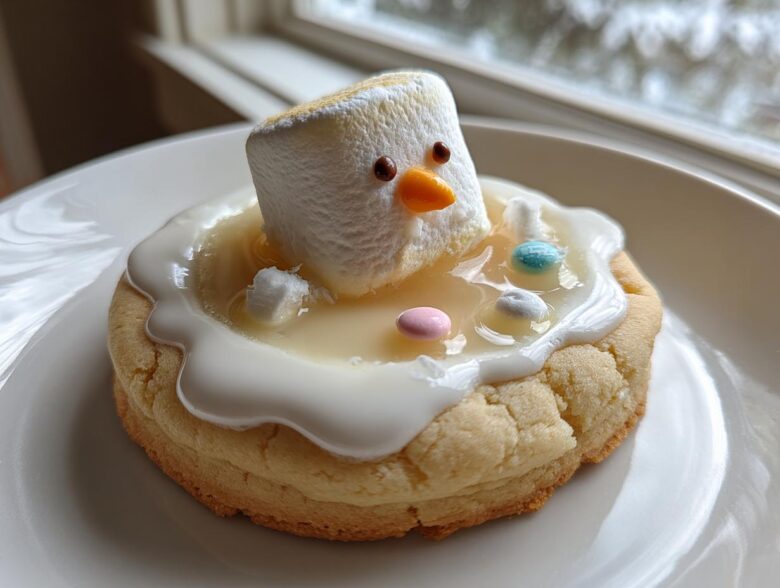
Oh my gosh, if you are looking for a baking project that screams winter cheer without needing complicated piping skills, stop right here! These melted snowman cookies are just the cutest things you’ll ever bake—and I mean *ever*. Seriously, who needs a flawless gingerbread man when you can have a little guy taking a delicious, gooey dip into a puddle of snow?
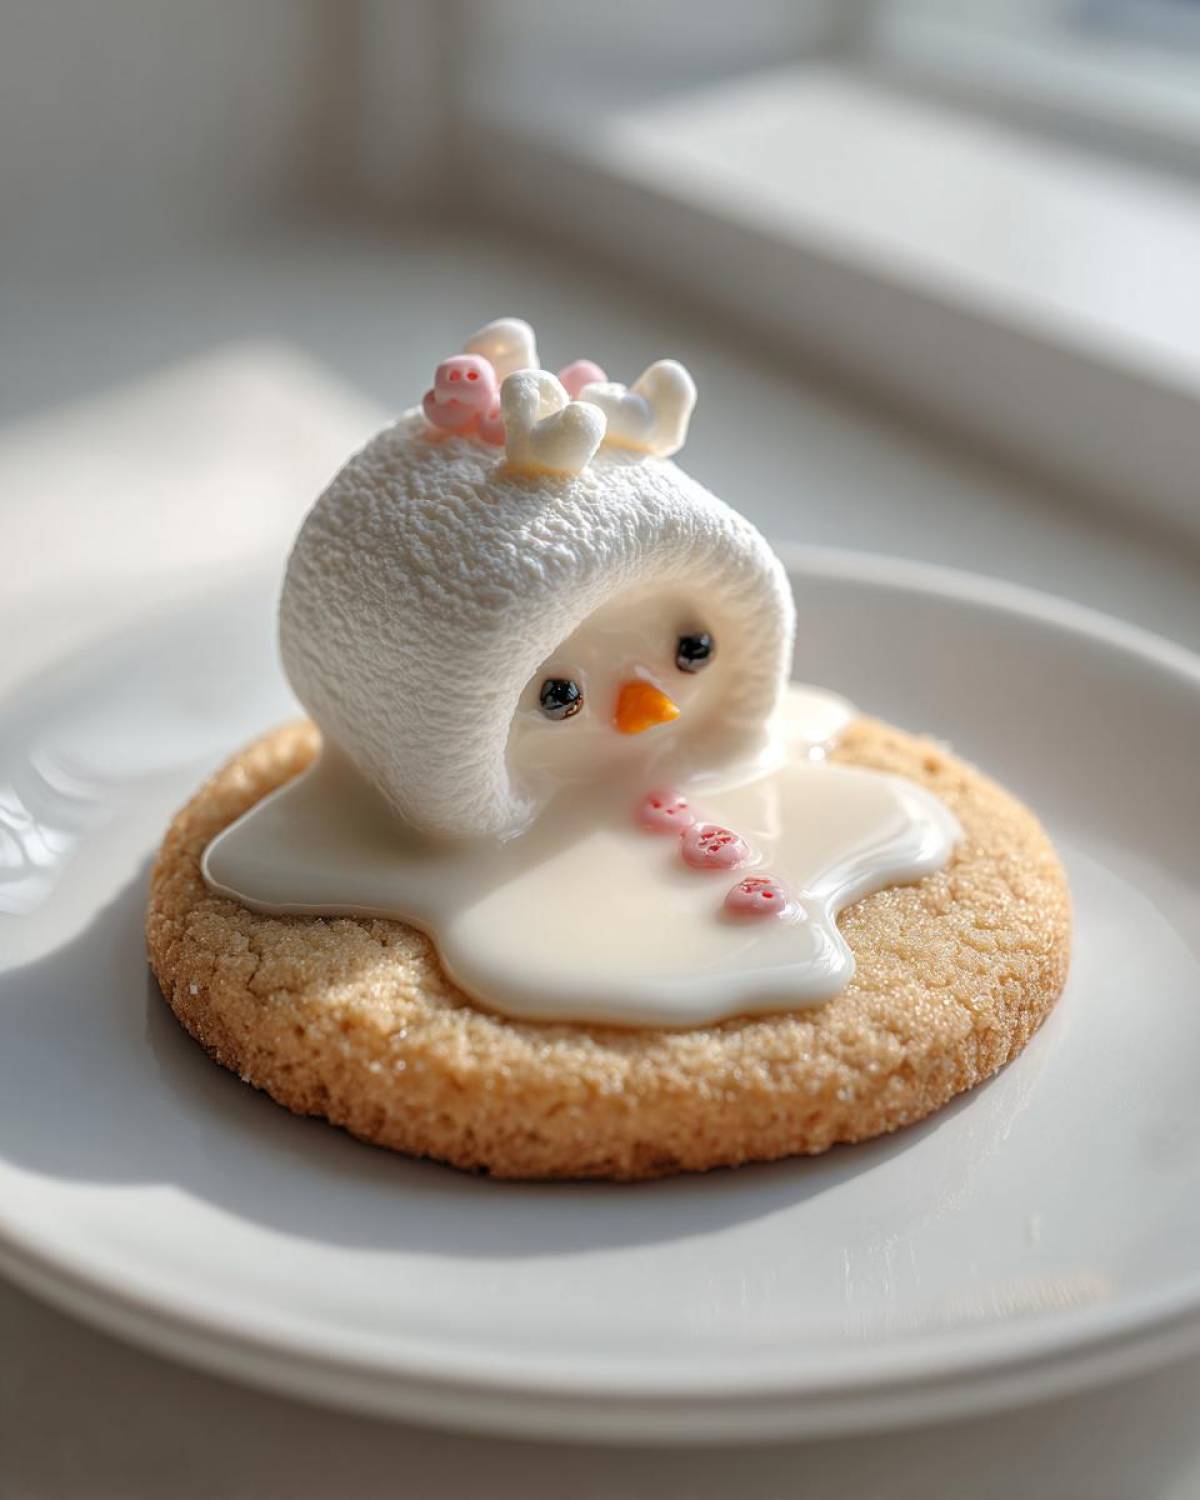
I’ve been making these for years ever since my nephew demanded something less “boring” than regular cutout cookies. Trust me, involving the kids in decorating these is pure joy; they get to decide just how much their little snowman is melting! They are fast, fun, and they honestly look better when they aren’t perfect.
If you’re looking for that perfect little bit of whimsy for your holiday baking repertoire, these are it. They look like they took hours, but I promise, this is one of the easiest recipes we have!
Why You Will Love These Melted Snowman Cookies
There are so many reasons why these become our go-to winter baking project every single year. For starters, they are inexpensive and everyone goes crazy for them at cookie exchanges. They just have that perfect whimsical touch!
- They are unbelievably cute! Seriously, the visual payoff for how little effort you put in is huge.
- The base is a fantastic, sturdy sugar cookie that holds its shape so well, making them perfect for festive cookie decorating.
- These kid friendly cookie recipes are genuinely fun; the best part is letting the kids decide just how much their snowman is melting!
- They are fast! Once the dough is mixed, you’re basically just using candies to bring these adorable winter cookies to life.
These delightful treats are total showstoppers without any of the stress a complicated bake requires. Trust me on this one!
Essential Ingredients for Melted Snowman Cookies
Okay, listen up, because the ingredients for these melted snowman cookies are almost as simple as the final look! We are keeping the cookie base fuss-free so all the magic can happen with the decorations later. I always recommend making the dough from scratch because it tastes better, but if you are short on time, trust me—even store-bought refrigerated sugar cookie dough works beautifully here. Don’t feel like you have to stress over every single component!
The key here is having all your little candies ready to go before you even start mixing the dough. Think of it like a little candy buffet for assembly time!
For the Sugar Cookie Base
We need some basics that make a really good, sturdy sugar cookie. Remember, it has to hold up to all that icing and those cute little candies!
- 2 1/4 cups all-purpose flour
- 1 tsp baking soda
- 1/2 tsp baking powder
- 1 cup unsalted butter, make sure it’s softened to room temperature!
- 1 1/2 cups granulated sugar
- 1 large egg
- 1 tsp vanilla extract
For the Snow Puddle Icing and Decorations
This is where the fun begins! The icing needs to be smooth enough to spread but thick enough not to run off the sides before it sets. And we need the snowman’s bits!
- 1 cup powdered sugar (don’t scoop it—sift it if you can!)
- 2 tablespoons milk or water (start slow here)
- 1/2 tsp vanilla extract
- Assorted small candies: Think mini M&M’s, sprinkles, or small chocolate chips for eyes/buttons.
- Licorice pieces or orange sprinkles for the scarf and nose.
- One large marshmallow per cookie—this becomes the head!
Step-by-Step Guide to Making Melted Snowman Cookies
This is the fun part! Making these melted snowman cookies is super straightforward once you have your ingredients laid out on the counter. Just follow my lead, and you’ll have genuinely adorable treats ready for the holidays. We break this down into three simple phases: making the dough, baking the circles, and then getting messy with the decorations!
Preparing the Cookie Dough
We start by setting up our dry ingredients. Go ahead and whisk together the flour, baking soda, and baking powder in a medium bowl. Give it a good stir and set it aside. Now for the wet stuff!
In a separate, large bowl, get your softened butter and granulated sugar beating together until they look totally light and fluffy. I usually use my hand mixer for this, but you can certainly do it by hand if you need an arm workout! Beat in that egg and the vanilla extract until everything looks happy and combined. Slowly add your dry mix to the wet ingredients, mixing on low speed. Stop as soon as you see that last streak of flour disappear—seriously, don’t overmix this batter!
My grandma always said chilling dough solidifies the flavor, so I recommend dividing the dough, flattening it into two discs, wrapping them up tight, and chilling them for at least 30 minutes. If you’re in a massive rush, you *can* skip the chill, but you might get cookies that spread a bit more, so chilling is my trusted recommendation!
Baking and Cooling the Base Cookies
Time to preheat that oven to 375 degrees F (that’s 190 degrees C). Line up your baking sheets with parchment paper; this saves so much cleanup later. Take one chilled dough disc and roll it out to about a quarter-inch thickness. Use a round cookie cutter—whatever size you prefer for a good body shape—and cut out your circles. Don’t overcrowd the pan!
Bake these plain circles for about 8 to 10 minutes. You are looking for edges that are just barely golden brown. Let them hang out on the hot pan for five minutes once they come out—this helps them firm up—then carefully move them onto a wire rack. They MUST be completely, totally cool before we move onto the decorating phase. If they’re warm, the icing melts right off, and we end up with a sad puddle, not a *melted snowman*! For a bonus tip, check out how I make cinnamon sugar donut holes!
Assembling Your Melted Snowman Cookies
While the cookies chill, whip up that simple icing: just whisk the powdered sugar, milk/water, and vanilla until smooth. If it looks like paste, add liquid by the drop until it drizzles slightly off your whisk. This icing is the snow puddle!
Start your festive cookie decorating! Take a cooled cookie and spread a thin, even layer of the white icing over the whole top. While that’s still wet, immediately take your large marshmallow and center it toward the top of the cookie—that’s the head! Now, get creative! Use your tiny candies for the eyes and mouth on the marshmallow. Use a tiny strip of licorice or a specific colored sprinkle to drape artfully down the side of the marshmallow for a scarf.
Use more small candies for the buttons on the cookie base itself. Finally, stick in that little orange sprinkle or tiny candy shard right under the marshmallow face for the carrot nose. That’s it! You’ve got a perfect melting scene on a cookie!
Expert Tips for Perfect Melted Snowman Cookies
When you’re making melted snowman cookies, especially with little helpers around, a few tricks make a huge difference in the final outcome. My biggest piece of advice? Prep all your candies *before* you start icing the cookies. Seriously, have little bowls ready for eyes, buttons, and scarves. It speeds everything up so the royal icing doesn’t start drying before you can place the marshmallow head.
To make this truly one of the best kid friendly cookie recipes, put the kids in charge of placing the decorative candies once you’ve spread the icing. They can handle tiny sprinkles and M&M eyes easily, but make sure an adult places the marshmallow head right on top of the wet icing—that keeps it stuck in place for good! Also, if you are planning ahead for a party, you can always make the cookie bases a day ahead and store them airtight. That little peek into my process, which I talk more about over at our ‘About Us’ page, is how I manage the holiday rush!
Ingredient Notes and Substitutions for Your Snowman Marshmallow Cookies
Now, let’s talk flexibility for these Snowman Marshmallow Cookies. If you’re totally crunched for time, please, use that refrigerated store-bought sugar cookie dough! It saves a ton of cleanup and honestly tastes fine here because the decoration steals the show anyway.
Also, marshmallows aren’t the only option for the head. If you want a sturdier top that won’t squish easily, try flattening a gumdrop instead! Sometimes a gumdrop just holds its shape better for transport. Just make sure whatever you choose is small enough to look like a cute head sitting on the snow puddle!
Storage and Keeping Your Melted Snowman Cookies Fresh
Once you’ve created these perfect little masterpieces, you want to keep them looking good, right? The biggest worry with decorated cookies is always the icing getting sticky, especially if you live somewhere humid. Don’t panic, though! These cookies are surprisingly sturdy.
The crucial thing for storing your melted snowman cookies is making sure that icing has completely set. I usually let them sit out uncovered on the counter for a good 4 to 6 hours after assembly, just to let that royal icing harden up properly. You want them to feel firm to the touch before you even think about stacking them.
When you are ready to store them, grab an airtight container—a cookie tin works perfectly. But here’s the secret: don’t stack them directly on top of each other right away! You risk smushing the marshmallow heads or smearing the scarves. Instead, I use pieces of wax paper or parchment paper between each layer. Just lay down one layer of cookies, pop a sheet of paper on top, then another layer, and repeat!
These usually stay perfectly fresh and delicious on the counter at room temperature for almost a week, which is fantastic for holiday prep. If you need to keep them longer, yes, they freeze beautifully! Just wrap the whole airtight container tightly in plastic wrap once the cookies are fully set and hardened. When you want to thaw them, just bring the container straight from the freezer to room temperature—don’t unwrap it until it’s fully thawed. That stops any condensation from forming on that adorable melted icing!
Frequently Asked Questions About These Adorable Winter Cookies
I always get so many questions when people see these silly little guys! They are truly one of those cute Christmas cookies that just sparks joy, so let’s clear up any last-minute baking worries you might have before you get started.
Can I use a different cookie base instead of sugar cookies for my melted snowman cookies?
Absolutely, you can! While the plain sugar cookie lets the white icing and candy decorations really pop, these cookies are great for experimentation. I think a nice, sturdy peanut butter snowman cookie would be an amazing change of pace. The slight saltiness of the peanut butter might actually taste fantastic with the vanilla icing. If you try that route, just make sure the peanut butter cookie base bakes up firm and doesn’t dome too much in the middle, or your snowman might look like he’s doing a backbend!
What is the best way to make the icing look like a melting puddle?
The secret to a perfect, messy, melting puddle look has everything to do with consistency. You want your icing to be thin enough that it spreads easily but thick enough that it settles slowly—not runs right off the cookie! When you mix the powdered sugar and liquid, aim for a consistency that flows slowly off your spatula in a ribbon that folds back into itself after about 10 seconds. When you spread it on the cookie, use a small offset spatula and just smooth it out gently. If you move too fast, you’ll end up with tool marks. If you move too slow, it spreads too thin! A gentle, slightly uneven spread on the cookie base really sells the whole melting snowman idea!
Are these easy snowman treats suitable for a large holiday party?
Oh, yes, they are perfect for parties! Because they are so colorful and fun, they make a fantastic statement on any dessert table. Plus, since they are sturdy sugar cookies, they handle being moved easier than a frosted cake. For a big event, my best advice for these easy snowman treats is to bake all the cookies two full days before the party and store them airtight. Then, assemble the icing and candies the day before the party. This way, you aren’t trying to bake *and* decorate on the actual day. You can find more of my quick party batch tips over at my contact page if you ever need help organizing your holiday baking schedule!
Nutritional Estimate for Melted Snowman Cookies
I always like to give a rough idea of what you’re working with when you bake, though keep in mind these numbers only apply if you are using the sugar cookie base recipe I provided and using standard-sized candy toppings!
- Serving Size: 1 cookie
- Calories: 180
- Sugar: 22g
- Sodium: 95mg
- Fat: 9g
- Saturated Fat: 5g
- Carbohydrates: 24g
- Protein: 2g
This information is just an estimate for planning purposes, of course! For official dietary concerns, you might want to check the packaging if you use store-bought dough or specific candies. I’ve got a full more detailed disclaimer on our site if you need a closer look.
Share Your Fun Holiday Desserts
I truly hope you have as much fun making these silly, adorable desserts as my family has had over the years. Seriously, these fun holiday desserts bring out the kid in everyone! Whether you’re making them for a Christmas cookie exchange, just a cozy night in, or packaging them as little gifts, I want to see what you create!
Head over to the main blog page, leave a rating if you loved this recipe, and tag me on social media when you post your own wonderfully melted snowmen! Happy Winter Baking!
Nutritional Estimate for Melted Snowman Cookies
I always like to give a rough idea of what you’re working with when you bake, though keep in mind these numbers only apply if you are using the sugar cookie base recipe I provided and using standard-sized candy toppings!
- Serving Size: 1 cookie
- Calories: 180
- Sugar: 22g
- Sodium: 95mg
- Fat: 9g
- Saturated Fat: 5g
- Carbohydrates: 24g
- Protein: 2g
This information is just an estimate for planning purposes, of course! For official dietary concerns, you might want to check the packaging if you use store-bought dough or specific candies. I’ve got a full more detailed disclaimer on our site if you need a closer look.
Share Your Fun Holiday Desserts
I truly hope you have as much fun making these silly, adorable desserts as my family has had over the years. Seriously, these fun holiday desserts bring out the kid in everyone! Whether you’re making them for a Christmas cookie exchange, just a cozy night in, or packaging them as little gifts, I want to see what you create!
Head over to the main blog page, leave a rating if you loved this recipe, and tag me on social media when you post your own wonderfully melted snowmen! Happy Winter Baking!
PrintEasy Melted Snowman Sugar Cookies

Make these adorable and simple melted snowman cookies using a basic sugar cookie base and fun candy decorations for a festive winter treat.
- Prep Time: 30 min
- Cook Time: 10 min
- Total Time: 40 min
- Yield: 24 cookies
- Category: Dessert
- Method: Baking
- Cuisine: American
- Diet: Vegetarian
Ingredients
- 2 1/4 cups all-purpose flour
- 1 teaspoon baking soda
- 1/2 teaspoon baking powder
- 1 cup unsalted butter, softened
- 1 1/2 cups granulated sugar
- 1 large egg
- 1 teaspoon vanilla extract
- For Decoration:
- 1 cup powdered sugar
- 2 tablespoons milk or water
- 1/2 teaspoon vanilla extract
- Assorted small candies (e.g., mini M&M’s, sprinkles, licorice pieces, small marshmallows)
- Large marshmallows (for the ‘head’)
Instructions
- In a medium bowl, whisk together the flour, baking soda, and baking powder. Set aside.
- In a large bowl, beat the softened butter and granulated sugar with an electric mixer until light and fluffy.
- Beat in the egg and vanilla extract until combined.
- Gradually add the dry ingredients to the wet ingredients, mixing on low speed until just combined. Do not overmix.
- Divide the dough in half, flatten into discs, wrap in plastic wrap, and chill for at least 30 minutes.
- Preheat your oven to 375 degrees F (190 degrees C). Line baking sheets with parchment paper.
- Roll out one disc of dough to about 1/4 inch thickness. Use a round cookie cutter to cut out circles for the snowman bodies.
- Place the circles on the prepared baking sheets. Bake for 8 to 10 minutes, or until the edges are lightly golden. Let cool on the baking sheet for 5 minutes before transferring to a wire rack to cool completely.
- While cookies cool, prepare the icing: Whisk together the powdered sugar, milk or water, and vanilla extract until smooth. Add more liquid, one drop at a time, if the icing is too thick.
- Once cookies are completely cool, use a small spoon or offset spatula to spread a thin layer of white icing over the entire surface of each cookie. This is the ‘snow puddle’.
- Immediately place one large marshmallow near the top center of the icing to represent the snowman’s head.
- Decorate the melting snowman: Use small candies to create the face (eyes, mouth) and buttons on the body portion.
- Use a small piece of red or orange candy (like a small sprinkle or cut licorice) for the carrot nose.
- Use a thin strip of licorice or a colored sprinkle for the scarf draped around the marshmallow head.
- Let the icing set before serving or storing.
Notes
- For a quicker option, you can use store-bought sugar cookie dough instead of making it from scratch.
- If you want a firmer ‘head,’ you can use a small, slightly flattened gumdrop instead of a marshmallow.
- Use black icing in a tube for drawing detailed eyes or a hat shape on the cookie base before placing the marshmallow.
Nutrition
- Serving Size: 1 cookie
- Calories: 180
- Sugar: 22g
- Sodium: 95mg
- Fat: 9g
- Saturated Fat: 5g
- Unsaturated Fat: 4g
- Trans Fat: 0g
- Carbohydrates: 24g
- Fiber: 0g
- Protein: 2g
- Cholesterol: 25mg