

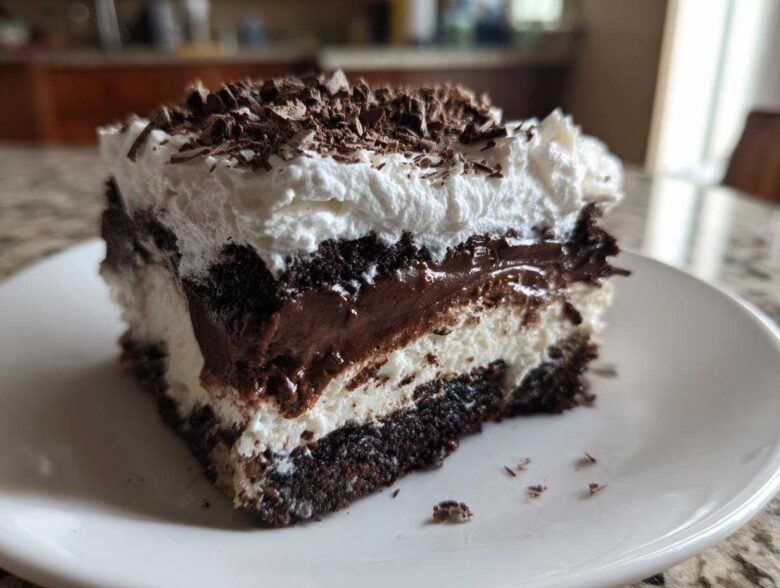
Listen, sometimes the craving for something intensely chocolatey hits, and the last thing you want to do is get the oven roaring, especially when the weather outside is already wild. You need decadent, you need layers, and you need it to be ready when you are, not the other way around. That’s where this magic happens! We are diving deep into the world of the brownie refrigerator cake, a beautiful, no-bake masterpiece built in layers that sets up perfectly in the cold.
Forget complicated baking techniques; this dessert is pure assembly genius. We’re stacking fudgy brownie crumbles against rich, homemade pudding and a tangy cream cheese layer. This recipe became my go-to for summer gatherings after perfecting the fudgy base layer—it never fails to disappear first!
If you need a serious Chocolate Lover Dream Dessert that you can honestly make the day before with minimal fuss, stick with me! Trust me, this is the ultimate quick chocolate fix without ever flipping a switch.
Why This Brownie Refrigerator Cake is Your New Favorite No Bake Brownie Dessert
I promise you, once you see how little effort this takes versus how incredible the final result tastes, you’ll be hooked. This recipe is the definition of a Crowd Pleaser Dessert because it hits all the right notes without demanding hours of your time.
Why is this the best Make Ahead Chocolate Cake you’ll find? It’s all about what you *don’t* have to do. No scary tempering, no fiddling with rising agents, just pure, satisfying assembly. It’s the perfect No Oven Chocolate Dessert for hot days or when your oven is already full!
Key Features of Our Creamy Refrigerator Cake
- The base is built on ultra-fudgy crumbles mixed with butter—it’s dense and chewy, not dry!
- We use a two-part creamy filling (cream cheese and pudding!) that sets up beautifully firm in the cold.
- It’s truly a No Bake Brownie Dessert; you’re just layering ingredients that are already delicious on their own.
- It tastes even better the next day, which is a massive win for anyone planning ahead for a party or potluck.
Gathering Ingredients for Your Brownie Refrigerator Cake
Okay, let’s talk supplies! This is where the speed of this recipe really shines. I’m including the easy route here, which means grabbing a box of good, fudgy brownies from the store. Look for that dense kind—we definitely aren’t using cakey ones for this!
You’ll need that box of brownies, naturally, some butter to bind our base, then the trio of creamy goodness: instant chocolate pudding mix, cream cheese that’s softened just right, and heavy whipping cream for the cloud on top. Don’t forget your sugar and vanilla! We keep this super simple so you can focus on layering, not complicated grocery lists.
If you’re looking for other great make-ahead ideas, you should peek at my pumpkin spice chia pudding recipe, but for now, let’s stay focused on chocolate heaven!
Ingredient Notes and Substitutions for the Brownie Refrigerator Cake
Now, the brilliance of this recipe is its adaptability. If you’re feeling ambitious when you start, you absolutely *can* bake your favorite fudgy brownie recipe from scratch instead of using the store-bought box. Just make sure they are completely cooled before you crumble them up—warm brownies equal greasy, melty bases!
When you’re making the pudding layer, please, please use the cold, full-fat milk listed. That extra fat content is what helps the pudding mixture thicken fast and gives your Creamy Refrigerator Cake that sturdy body it needs to hold up the topping.
For the top layer, if whipping cream feels like too much work, I get it! You can swap it out for a tub of thawed frozen whipped topping. It won’t taste quite as pure, but it still gives you that light contrast to the rich layers underneath.
Step-by-Step Assembly of the Easy Layered Brownie Dessert
Alright, let’s get messy! This is the fun part where everything comes together without any heat involved. Seriously, assembling your brownie pudding dessert should feel more like building spectacular LEGOs than actual baking. We need to work in three stages: the base, the filling, and finally, the crowning glory on top, all while respecting the chilling times. If you rush the chilling, I can’t be held responsible for a soupy mess!
Creating the Fudgy Brownie Base Layer
First things first, grab that store-bought brownie package. I want you to crumble them up—really break them down into nice, small, fudgy bits. Don’t use a food processor unless you want powder; we want crumbles! Once they look suitably smashed, pour over that melted butter and get your hands in there. You need to mix this until every single crumb has that buttery sheen. It should clump together nicely when you squeeze a handful.
Now, take your 8×8 pan—make sure it’s lined with parchment paper first, leaving those handles hanging over the side like little seatbelts! Press this brownie-butter mixture firmly into the bottom. And I mean firmly. Use the flat bottom of a measuring cup if you need extra leverage here. This foundation has to be sturdy to hold up all the glory coming next. Pop that into the freezer for just 15 minutes while you mix your first filling. That quick chill solidifies the base so our next layer doesn’t sink into it.
Mixing the Brownie Pudding Dessert Filling
This is where we introduce that delightful tang that cuts through the chocolate richness. First, tackle the pudding—whisk your instant chocolate pudding mix with the cold milk for just a couple of minutes until it starts thickening. Don’t over-whisk until it’s rock solid; just until it coats the whisk. Set it aside to cool just slightly; you don’t want scorching hot pudding melting your cream cheese!
While that’s cooling, beat your softened cream cheese with the powdered sugar and vanilla until it’s beautifully smooth—no lumps allowed! Remember, lumps are enemies of a great brownie refrigerator cake. Once the pudding has cooled just a tiny bit, you need to gently fold it into the cream cheese mixture. I mean gentle folding, like tucking someone into bed. If you beat it hard, you’ll deflate all the air we built up, and we want that ultra-creamy texture. This combined mixture is heavenly!
Final Layering and Setting the Chilled Chocolate Cake Recipe
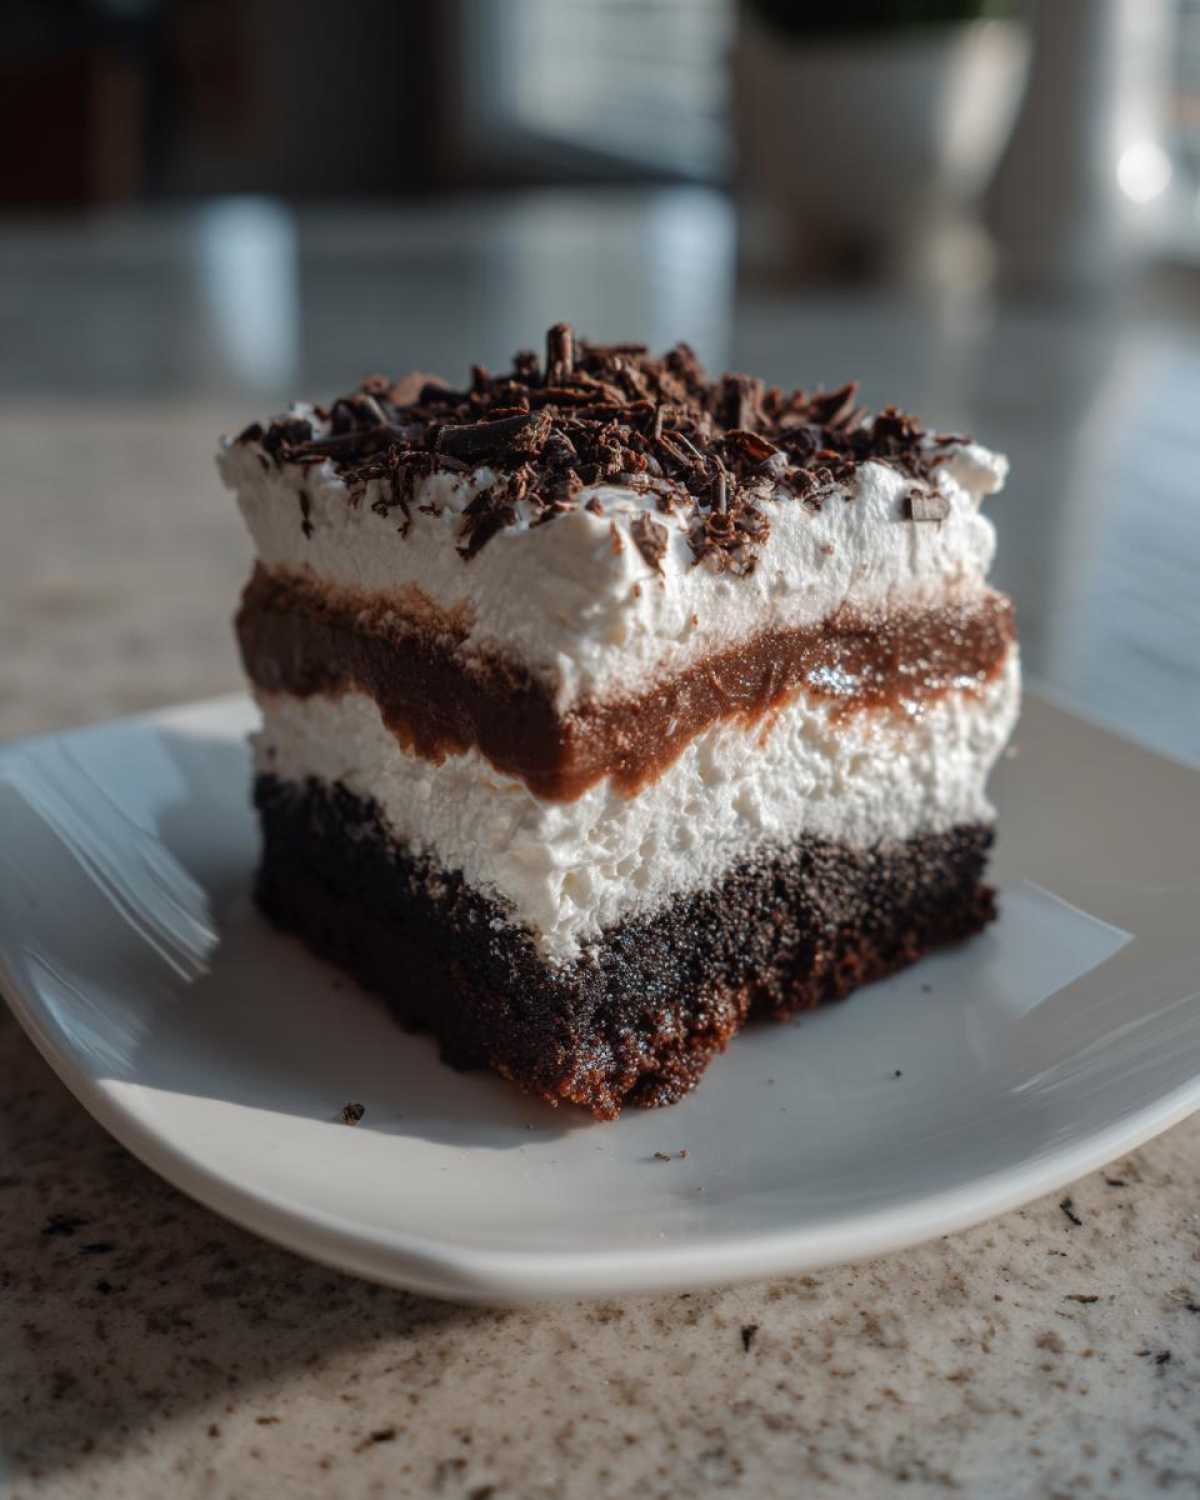
Once the base is firm from its quick freeze, pull it out! Carefully spread that glorious cream cheese-pudding layer across the top. Take your time to get it even; we are aiming for those perfect Simple Chilled Layers you see in all the beautiful pictures. Pop the whole thing back into the fridge for a solid hour. This allows that middle layer to firm up before we add the final whipped topping; otherwise, they’ll swirl together, and that’s not the look we want for this Chilled Chocolate Cake Recipe.
After that hour, whip up your heavy cream and sugar until you get those stiff, beautiful peaks. Spread that cloud gently over the pudding layer. Now, the hardest part of the whole process: waiting! Cover the pan loosely—we don’t want condensation dripping onto the whipped cream—and let it chill for a minimum of four hours. Honestly? If you can let this Easy Layered Brownie Dessert sit in the fridge overnight, you’ll be rewarded with the absolute best, most sliceable result. It firms everything up perfectly!
Check out my tips for pecan pie bars—though those require baking, the technique of chilling for flavor development is similar!
Tips for Success with Your Brownie Refrigerator Cake
Even though this recipe is super simple, I learned a couple of hard lessons the first few times I assembled this beauty. My first attempt at a brownie refrigerator cake ended up looking more like a chocolate swamp because I rushed Step 3—the chilling of the pudding layer!
To make sure you get those perfectly clean slices every single time, here are my top three non-negotiable rules for managing this Fudgy Brownie Dessert:
- Don’t Skimp on the Pressing: When you are packing that buttered brownie base into the pan, really press down hard. I mean it! If the base is too loose, the weight of that creamy filling (Steps 3 and 4) will push down, and your whole bottom layer will crumble when you try to lift it out later.
- The Milk Temperature Matters for Pudding: This is something I messed up constantly until someone pointed it out. When you mix the instant pudding with the cold milk, you have maybe two minutes before it sets up quite firmly. If your cream cheese mixture is too warm, or if you let the pudding sit out too long before folding, the mixture gets grainy. Add the pudding to the cream cheese mixture almost immediately after it thickens for the silkiest finish.
- Parchment Paper is Your Best Friend: I mentioned using the overhang above, but I can’t stress this enough for removing the cake cleanly. If you aren’t using parchment paper that extends high over the sides of the pan, you will end up having to scoop it out with a spatula—and nobody wants that presentation for their Potluck Chocolate Dessert! Lifting it out gently, cold and firm, is the key to showing off those stunning layers.
Trust these little hacks, and your No Bake Brownie Dessert will look professional-grade every time. Happy chilling!
Serving Suggestions for This Crowd Pleaser Dessert
Because this brownie refrigerator cake is so incredibly rich and fudgy—seriously, it’s intense chocolate bliss—it pairs wonderfully with something bright and tart to cut through all that creaminess.
When I take this to a gathering, I always set it out with a bowl of fresh raspberries or thinly sliced strawberries on the side. The pop of acidity is just divine against the cool, dense layers. If you are serving it after dinner, a strong, black cup of coffee or a shot of espresso alongside each slice makes the chocolate flavor sing even louder!
For presentation, skip the extra heavy glaze; just a light dusting of high-quality cocoa powder or a generous shower of chocolate shavings keeps it looking elegant enough for a party but easy enough for a weeknight treat. Enjoy this perfect Potluck Chocolate Dessert cold!
Storage and Reheating Instructions for the Brownie Refrigerator Cake
The best part about a brownie refrigerator cake like this is that it’s practically designed for leftovers, which makes it an amazing Make Ahead Chocolate Cake. Because we aren’t using any eggs that need to be baked, storage is super easy, but you do have to be mindful of moisture!
In the refrigerator, covered tightly—and I mean tightly—this layered beauty will keep beautifully for about four to five days. After day five, the brownie base—even though it’s mixed with butter—can start to get a little too soft from absorbing moisture from the top layers. You want that contrast between the fudgy base and the creamy center, so try to enjoy it within that window!
Now, can you freeze it? Yes, you absolutely can, though it changes the texture slightly, which is why I only recommend freezing leftovers if you must!
Freezing Your Creamy Refrigerator Cake
If you decide you need to bank this chocolate indulgence for another week, you need to prepare it for the deep freeze. Make sure the entire cake is totally set and firm from its final chill time. Place it in the pan, cover the top tightly with plastic wrap first, and then wrap the whole pan securely in a layer of aluminum foil. This double-layer defense prevents freezer burn and stops that whipped cream from absorbing any weird freezer smells.
When you are ready to serve chunks of your frozen Chilled Chocolate Cake Recipe, pull out the portion you want the night before. Let it thaw slowly in the refrigerator for about 8 to 10 hours. Do not try to thaw this at room temperature; the layers will get sweaty and collapse as the cream softens too quickly! Serving it straight from the fridge after thawing gives you a denser, almost icebox-pie texture, which is surprisingly delicious if you like your chocolate extra firm.
Serving Straight From the Fridge
If you aren’t freezing it, just keep it covered in the fridge. If it’s been sitting in there for 24 hours or more, you might want to let it sit on the counter for about 10 minutes before slicing. This just takes the chill off the cream cheese layer, making it a tiny bit softer on the palate and much cleaner to cut. See? Easy storing means easy eating later!
Frequently Asked Questions About the Brownie Refrigerator Cake
I know you have questions! When you venture into the world of no-bake desserts, sometimes you worry about firmness or ingredient sourcing. Don’t stress; I’ve been asked these same things a thousand times by friends staring suspiciously at my amazing Brownie Pudding Dessert, wondering if it’s going to flop.
Let’s clear up the final sticking points so you can move forward confidently with assembling your layers!
Can I substitute the store-bought brownies in this brownie refrigerator cake?
Absolutely you can! While using the store-bought, fudgy variety is my personal time-saver hack, if you have the time, baking your own batter is always a plus. The absolute key here is cooling, cooling, cooling! If you bake homemade brownies, they must be completely cooled—room temperature or even slightly chilled—before you start crumbling them. Warm brownies mixed with melted butter just turn into gooey mush instead of those lovely, defined crumbles we need for the base layer.
How far in advance can I make this Chilled Chocolate Cake Recipe?
This is honestly the best feature of this dessert! Since everything relies on chilling, you can assemble the entire thing, topping and all, and let it set in the fridge. For structure, I always aim for at least four hours, but if you want the absolute best flavor melding—where the pudding filling starts to subtly infuse the brownie base—make it the day before you plan to serve it. Overnight chilling is the sweet spot for this Creamy Refrigerator Cake.
What if my instant pudding seems too thin after folding it in?
Oh, I hate when that happens! If you find your pudding mixture seems wetter than you’d like before you spread it over the base, don’t panic and don’t add more milk! Instead, stick the mixture in the freezer for about 10 minutes. Take it out, stir it once, and that cold shock will help the stabilizers in the instant pudding kick in quickly. It will firm up enough for you to spread it evenly as a nice, sturdy layer.
Can I make this a summer-friendly No Bake Brownie Dessert using fresh fruit instead of chocolate shavings?
Yes! That sounds fantastic. If you are taking this out on a hot day and want to keep it light, fresh fruit is a wonderful addition to this Summer Chocolate Treat. I would avoid putting fruit directly on top of the whipped cream layer, though, because the moisture can break down the cream over time. Instead, slice fresh berries or maybe some kiwi, and serve them alongside the sliced cake, or maybe layer them right on top of the cream cheese layer before adding the whipped cream topping! That way, you get the brightness without sacrificing that gorgeous final cloud!
Nutritional Estimates for This Fudgy Brownie Dessert
I always try to keep track of what we are eating, but remember, these numbers are just estimates! They all depend on the exact brands of store-bought brownies and pudding mixes you decide to use for your decadent brownie refrigerator cake.
When I calculated these figures based on the ingredients laid out for a standard 8×8 pan cut into 9 squares, here’s what we are looking at for one square of this amazing, yet rich, Fudgy Brownie Dessert.
Please keep in mind that this counts as a serious indulgence, so maybe save this for when you really need that Quick Chocolate Fix!
- Serving Size: 1 square
- Calories: 410
- Fat: 24g
- Saturated Fat: 14g
- Trans Fat: 0.5g
- Carbohydrates: 48g
- Sugar: 38g
- Fiber: 2g
- Protein: 5g
- Cholesterol: 55mg
- Sodium: 280mg
See how the sugar is creeping up there? That’s the price we pay for layers of pudding and rich cream cheese, but honestly, every single gram is worth it when you dig in! Enjoy this amazing No Bake Brownie Dessert!
Share Your Experience Making This Brownie Refrigerator Cake
Okay, now it’s your turn to get in on the fun! I’ve shared all my secrets for making this brownie refrigerator cake as fudgy and perfectly layered as possible, but I truly want to know what you think.
Did you manage to keep your hands off it while it chilled overnight, or did you sneak a finger-swipe of that whipped cream topping before it was time to serve? Seriously, tell me everything! Did you stick with the store-bought brownies, or did your homemade batch win out?
When you leave a comment below, tell me which layer was your favorite! Was it the chewy, buttery base, the tangy cream cheese filling, or that light, airy cloud on top? I always struggle between the base and the center layer—they are just so good together.
And if you snapped a photo of your finished Easy Layered Brownie Dessert before you demolished it (because let’s be honest, these don’t last long!), please share it on social media and tag me! I love seeing how my recipes turn out in your kitchens. You can find all my latest kitchen adventures over on the blog!
PrintDecadent No-Bake Brownie Refrigerator Cake
Assemble this rich, layered chocolate cake using fudgy brownie crumbles, creamy pudding, and a tangy cream cheese layer. This dessert sets up perfectly in the refrigerator, making it ideal for make-ahead preparation.
- Prep Time: 25 min
- Cook Time: 0 min
- Total Time: 4 hr 25 min
- Yield: 9 servings
- Category: Dessert
- Method: No Bake/Chilling
- Cuisine: American
- Diet: Vegetarian
Ingredients
- 1 (18 ounce) package store-bought fudgy brownies
- 1/2 cup unsalted butter, melted
- 1 (3.9 ounce) package instant chocolate pudding mix
- 2 cups cold milk
- 8 ounces cream cheese, softened
- 1 cup powdered sugar
- 1 teaspoon vanilla extract
- 1 cup heavy whipping cream, cold
- 1/4 cup granulated sugar (for whipped cream)
- Chocolate shavings, for topping
Instructions
- Crumble the store-bought brownies into fine pieces. Mix the brownie crumbles with the melted butter until evenly coated. Press this mixture firmly into the bottom of an 8×8 inch square pan lined with parchment paper, leaving an overhang for easy removal. Place the base in the freezer for 15 minutes.
- Prepare the chocolate pudding according to package directions, using 2 cups of cold milk. Whisk until slightly thickened, about 2 minutes. Set aside to cool slightly.
- In a separate bowl, beat the softened cream cheese, powdered sugar, and vanilla extract until smooth and creamy.
- Gently fold the slightly cooled chocolate pudding into the cream cheese mixture until just combined. This is your cream cheese layer.
- Spread the cream cheese-pudding mixture evenly over the chilled brownie base. Return the pan to the refrigerator to set for at least 1 hour.
- In a clean bowl, whip the heavy whipping cream and granulated sugar until stiff peaks form.
- Spread the whipped cream evenly over the set pudding layer.
- Cover the cake loosely and refrigerate for a minimum of 4 hours, or preferably overnight, to allow the layers to firm up completely.
- Before serving, lift the cake out of the pan using the parchment paper overhang. Top generously with chocolate shavings. Slice and serve cold.
Notes
- For a richer brownie base, you can bake your favorite fudgy brownie recipe and crumble it once cooled.
- Use full-fat milk when preparing the instant pudding for the best texture.
- If you prefer a lighter topping, substitute the whipped cream with frozen whipped topping (thawed).
Nutrition
- Serving Size: 1 square
- Calories: 410
- Sugar: 38
- Sodium: 280
- Fat: 24
- Saturated Fat: 14
- Unsaturated Fat: 8
- Trans Fat: 0.5
- Carbohydrates: 48
- Fiber: 2
- Protein: 5
- Cholesterol: 55