

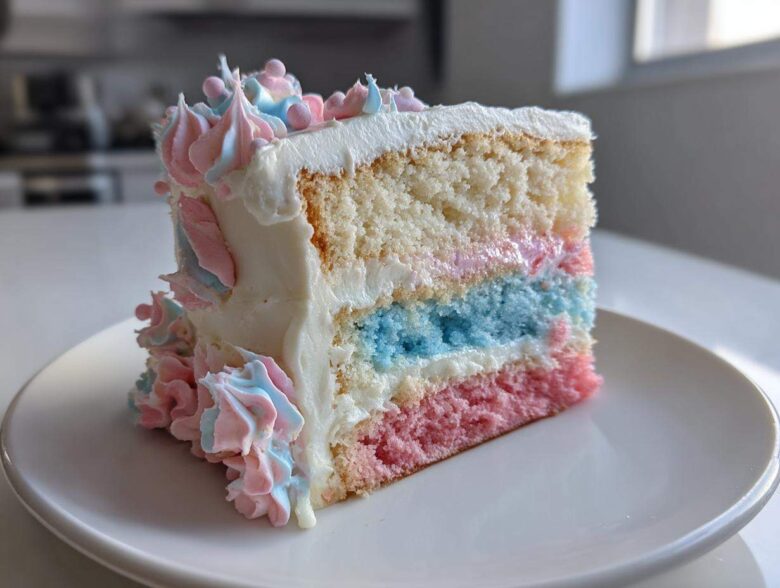
Oh my gosh, are you ready for some pure magic? Sometimes baking isn’t just about the taste; it’s about capturing that wild, joyful feeling of being a kid at the county fair again! I swear, rolling out recipes for a proper cotton candy cake transports me straight back to sticky fingers and bright lights. This isn’t just another dessert; this is the ultimate fluffy pastel confection, and trust me, it delivers that unforgettable, whimsical vibe everyone craves for birthdays.
I first whipped this up for my niece’s seventh birthday after reading all about fun baking, and honestly, watching her face when she saw the swirling pink and blue looked like I’d baked happiness itself. We nailed the texture—it’s incredibly light—and the flavor pops beautifully thanks to a couple of little secrets I learned along the way. If you need a showstopper that tastes as fun as it looks, you are in the absolute right spot. Welcome to the fluffiest, most nostalgic bake of your life!
Why This Fluffy Cotton Candy Cake is Your Next Showstopper Cake Recipe
You know those desserts that make everyone stop talking when you bring them out? This is that cake! I picked this recipe because it checks every single box for an absolutely gorgeous, yet manageable, party centerpiece. If you want that nostalgic carnival vibe made easy, stick with me.
Key Benefits of Our Cotton Candy Cake
- It brings incredible visual drama thanks to those soft, beautiful pastel layer cake shades of pink and blue swirling together.
- You get a truly light and airy texture—this is a genuinely fluffy cake recipe, not a dense brick!
- The subtle cotton candy flavor is sweet and fun, making it the ultimate whimsical birthday cake for all ages.
- It requires surprisingly simple decorating techniques to look like a professional made it!
Gathering Ingredients for Your Cotton Candy Cake
Okay, you can’t fake that carnival magic, which means we have to be super precise with our ingredients here. It’s not just about throwing stuff in a bowl; the right texture depends on getting these components just right. Don’t skip the prep work for the frosting, either—you need that real flavor pop!
Cake Batter Ingredients for the Pastel Layer Cake
For the base layers that are going to turn out so lovely and light, you’ll need to gather:
- 1 1/2 cups of unsalted butter, make sure it’s softened—not melted, softened!
- 4 large eggs, they really help with the fluffy factor here.
- 1 cup granulated sugar and 1/2 cup vegetable oil.
- 2 1/2 cups all-purpose flour, 1 tablespoon baking powder, and 1/2 teaspoon salt whisked together.
- 1 cup buttermilk and 1 teaspoon clear vanilla extract mixed.
- Crucially, you need 1/2 cup of crushed, plain, store-bought cotton candy to actually infuse that sweetness right into the cake itself.
- And have your pink and blue gel food coloring ready at hand! Gel works best so it doesn’t thin out the batter.
Ingredients for Homemade Cotton Candy Frosting Tutorial
This is what makes the whole thing sing, so don’t skimp on quality:
- 4 cups of powdered sugar, and you absolutely must sift this! Sifting is our defense against lumpy frosting.
- 1/2 teaspoon almond extract, regular vanilla extract (1 teaspoon), and 1/4 cup heavy cream.
- The star: 1/4 cup of high-quality cotton candy flavoring oil. Extracts won’t cut it here; the oil holds the true flavor.
- We need the butter soft again, so grab 1 1/2 cups of unsalted butter.
- Keep your gel coloring nearby because we’ll be dividing this frosting into three different colors!
Step-by-Step Instructions for the Cotton Candy Cake
Now for the fun part! I know baking a layer cake can look intimidating, but honestly, this is a super straightforward recipe once you break down the steps. My goal here is to get you that amazing fluffy cake recipe result without all the stress. Remember to have your oven preheated to 350°F (175°C) and those three 8-inch pans greased and floured *before* you even turn the mixer on!
Mixing the Fluffy Cake Batter
First things first, grab your dry stuff—the flour, baking powder, and salt—and whisk that all together really well. Set that aside. In your big mixing bowl, cream that softened butter with the granulated sugar until it looks light and fluffy; that takes a couple of minutes. Then, just beat in that vegetable oil, followed by your four eggs, going one at a time so they incorporate nicely. Don’t rush this aeration part!
Next, we alternate! Slowly stream in the dry ingredients, alternating with your buttermilk and clear vanilla mix. Always start and end with the dry ingredients. This is crucial for a fluffy cake recipe! Stop mixing the second it’s combined—seriously, we do *not* want to overmix this batter or it gets tough.
Creating the Pink and Blue Swirl Cake Layers
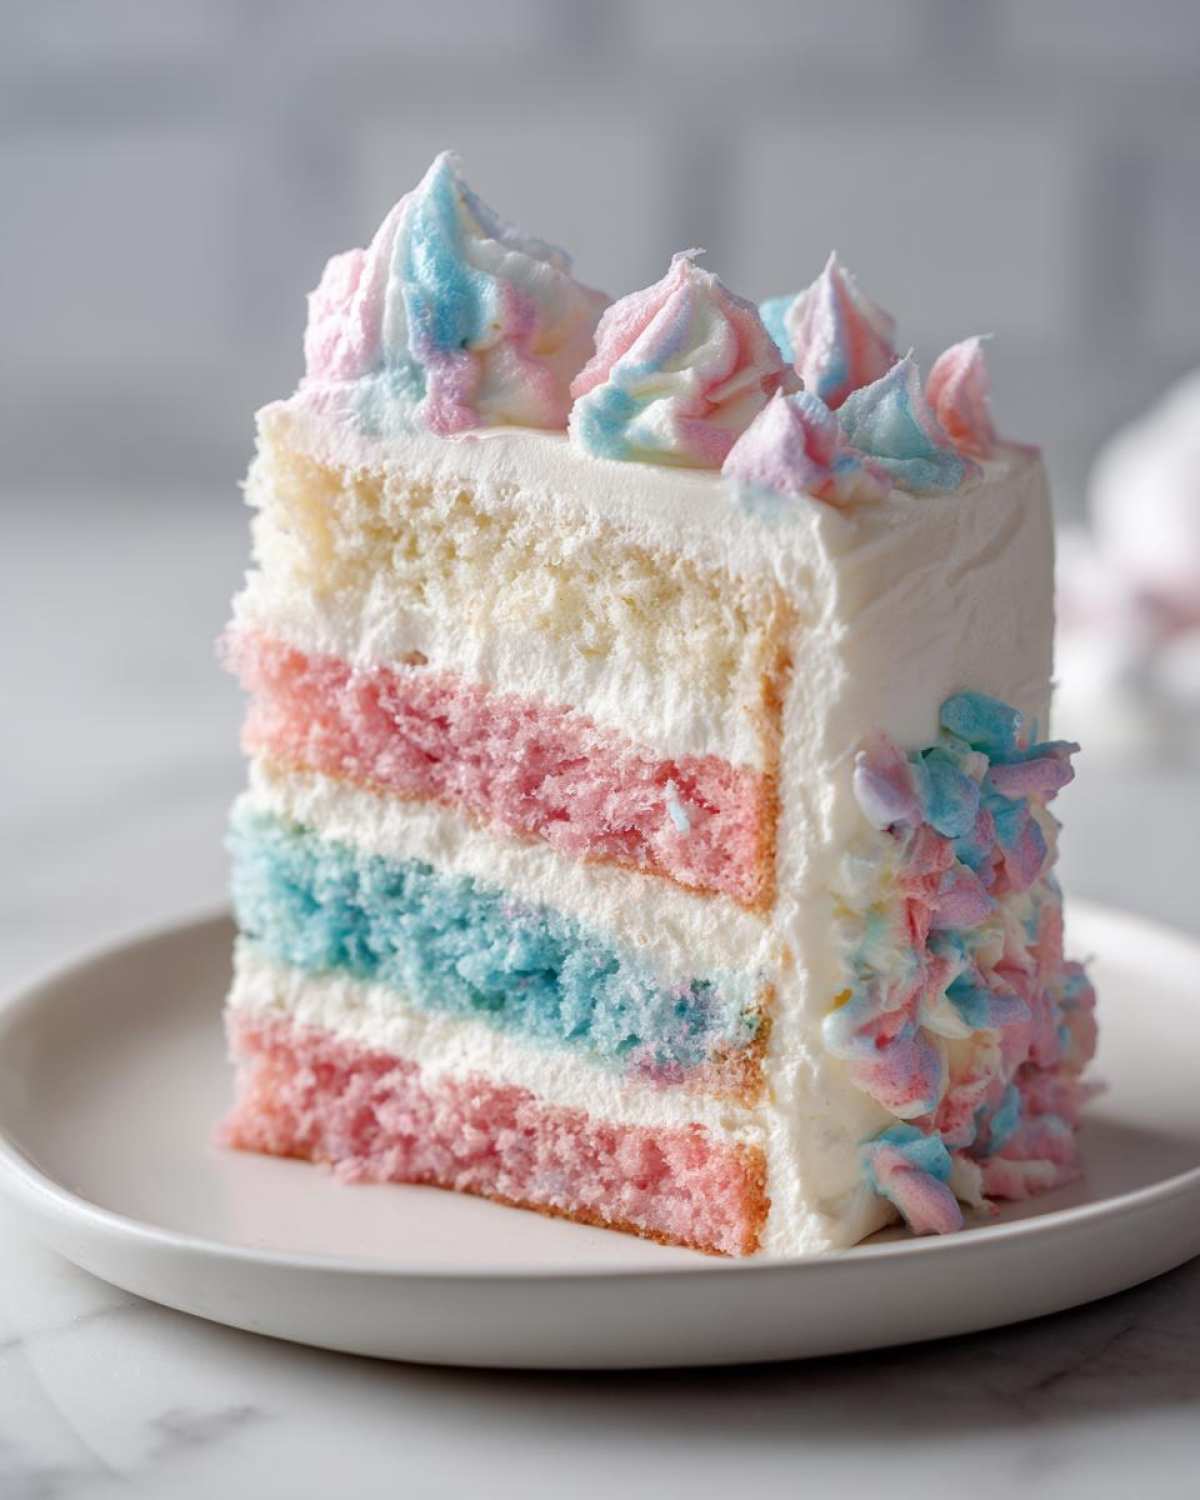
This is where the magic starts! Divide that lovely white batter evenly among your three separate bowls. Into the first bowl, gently stir that crushed, store-bought cotton candy—that’s your pure white, infused layer. Then, take your second bowl and stir in just a few drops of pink gel color until it looks perfect for your pastel layers. Do the same with the third bowl using the blue. Pour each color into a separate prepared pan and bake them for about 25 to 30 minutes. They are done when a toothpick comes out clean. Let them chill in the pans for just 10 minutes before you pop them out onto a rack to cool completely. They need to be fully cool before frosting, trust me on this!
Assembling the Cotton Candy Buttercream Frosting
While those cakes cool down, let’s make the frosting. Beat that softened butter until it’s creamy, then slowly beat in the sifted powdered sugar. Once that’s incorporated, beat in your heavy cream, vanilla, almond extract, and that amazing cotton candy flavoring oil. Keep mixing until it’s light and fluffy—this step really develops the volume!
Now, grab three bowls again. Leave one portion white for our middle layer. Tint the second portion light pink and the final third light blue with your gel colors. We aren’t using all the colored frosting for the layers, just reserve a little for decoration later on the outside finish!
Expert Tips for a Perfect Cotton Candy Cake Assembly
Getting this cake assembled is where you seal the deal on that showstopper look! You want sharp edges and perfectly blended colors, right? My biggest piece of advice is to make sure those cake layers are completely cool—I often pop them in the freezer for fifteen minutes if I’m really rushing the frosting stage.
Achieving the Pink and Blue Swirl Cake Decoration
Start with your base! Place your white cake layer down first on your stand or platter. Spread a generous but even layer of the plain white frosting over the top. Then, place the pink layer on next, followed by the blue layer. Once stacked, you’re going to cover the whole thing in a thin ‘crumb coat’ of the remaining white frosting. Chill that for about twenty minutes; it locks in all those messy bits so your final coat is smooth as silk.
For the final finish, take your reserved bits of pink and blue frosting. I use an offset spatula to gently swipe those colors around the top edge, creating a gorgeous, subtle, pink and blue swirl cake look against the main white coat. You don’t want harsh lines—think soft, dreamy pastels! Keep it light on the sides if you want the layers to peek through a little, or smooth it completely for a solid color block effect.
Storage & Reheating Instructions for Your Cotton Candy Cake
Alright, let’s talk about keeping this pastel beauty fresh! This is an easy celebration cake, but because of that fresh cotton candy flavor and the delicate nature of spun sugar, storage is kind of important. If you’re making this ahead of time—which I totally recommend for big parties—don’t frost the layers until the day you plan to serve it. That way, the cake layers stay perfectly moist and fluffy!
If you’ve already frosted the whole thing, it needs to go in the fridge. Pop it in an airtight container, or cover it very loosely with plastic wrap so it doesn’t dry out. Because of all that butter in the frosting, you’ll want to let it sit out on the counter for about an hour before serving so it softens up again; cold frosting is just sad frosting.
Now, listen closely—this is the most critical part for keeping that carnival nostalgia alive. You absolutely cannot, under any circumstances, put the actual fresh cotton candy garnish (the stuff you sprinkle on top) on the cake until the very second you bring it to the table. That sugary fluff is basically made of air and humidity loves it! One minute it’s there, the next minute it’s just sticky goo dissolving into your beautiful frosting. Save that final fluffy topping for the last ten minutes before the happy birthday song starts singing!
Ingredient Spotlight: Homemade Cotton Candy Flavor
If you want the absolute best cotton candy cake flavor, you have to talk about the flavoring oil. A lot of recipes call for vanilla or maybe even specialty extracts, but honestly, for that bright, unmistakable taste—you need oil.
Extracts are water-based, and they tend to evaporate or wash out during baking, leaving you with just a faint sweetness. But the oil clings to the fat in our butter and sugar, infusing that pure, spun-sugar sweetness directly into the crumb and the frosting like it belongs there! Trust me on this: splurge a little on a high-quality flavoring oil. You can usually find it online or specialized baking supply stores. It makes all the difference between a ‘pink’ cake and a true, nostalgic carnival flavor experience!
Frequently Asked Questions About This Cotton Candy Cake
I get so many questions about this cake, which just tells me you all love the idea of a fun, easy celebration cake as much as I do! Here are a few things readers ask me most often about diving into this whimsical bake.
Can I make this a no-bake cotton candy dessert?
That’s a great question if you’re short on oven time! For this specific recipe—the amazing fluffy cake recipe with the infused batter—you really do need to bake those layers. That process is what sets the texture and allows the crushed cotton candy to melt slightly into the crumb, giving it that signature chewiness. If you really need a no-bake option, I suggest buying plain vanilla cake layers from the bakery, letting them dry out slightly, and just focusing all your fun on making the cotton candy frosting and the pink and blue swirl decoration over the top!
How do I ensure my cake layers are perfectly level for this pastel layer cake?
For a true showstopper cake recipe, level layers are key for stacking neatly! While my recipe bakes up pretty evenly, I swear by using baking strips. These are just strips of fabric you soak in water (sometimes with a little white vinegar) and wrap around the outside of your cake pans before baking. They insulate the edges, forcing the cake to bake evenly from the center out, meaning no huge domes on top! If you forgot the strips? No sweat. Just let the cakes cool completely, and use a long serrated knife to gently slice off any slight dome once they are out of the pan.
If you have any other questions, please feel free to reach out via my contact page! I love hearing from everyone tackling this fun, kid friendly birthday cake!
Nutritional Estimates for the Cotton Candy Cake
Okay, let’s be real for a second, this is a celebration cake, and trying to calculate the *exact* calories in a dessert this much fun is probably a lost cause! Plus, flavorings and frosting techniques can really change things up. But for those of you keeping a general eye on things, I’ve put together some rough estimates based on standard serving sizes.
Please remember these figures are just approximations based on the ingredients listed above, and they assume you get 12 slices out of the whole cake. If you cut giant slices (which, honestly, who hasn’t?), your numbers will definitely go up!
For a single slice of this magnificent cotton candy cake, here’s what we’re looking at:
- Calories: Around 450 per slice. It’s sugar and butter, friends, it’s going to pack a punch!
- Total Fat: Roughly 20 grams. Remember, we used real butter because flavor wins!
- Total Carbohydrates: About 68 grams, most of that coming from the sugar content.
- Protein: A humble 4 grams.
It’s definitely a treat, not an everyday snack, which is exactly how those nostalgic childhood treats should be treated, right? Enjoy every bit of it!
Share Your Whimsical Birthday Cake Creations
I had such a blast walking you through making this super fun, totally over-the-top cotton candy cake! Now it’s your turn to bring this pastel dream to life for your next celebration. Seriously, I want to see all the pink, blue, and fluffy goodness you create!
Once you finish baking and decorating, please head back here and leave a rating for this recipe—those star ratings really help other bakers know they are on the right track for an easy celebration cake. Did you use extra cotton candy on top? Did the kids love the flavor? Tell me everything in the comments below!
And if you post pictures on social media, please tag me! I absolutely love sharing my readers’ successes. Seeing my recipes bring joy and color to your tables is the best part of doing this. Happy baking, and don’t forget to enjoy that slice of pure, sweet nostalgia!
PrintFluffy Pastel Cotton Candy Layer Cake with Cotton Candy Buttercream Frosting
A recipe for a visually striking, fluffy layer cake featuring pink and blue pastel layers and topped with homemade cotton candy flavored buttercream, perfect for birthdays and celebrations.
- Prep Time: 45 min
- Cook Time: 30 min
- Total Time: 75 min
- Yield: 12 servings
- Category: Dessert
- Method: Baking
- Cuisine: American
- Diet: Vegetarian
Ingredients
- 1 1/2 cups unsalted butter, softened
- 4 cups powdered sugar, sifted
- 1 teaspoon vanilla extract
- 1/2 teaspoon almond extract
- 1/4 cup heavy cream
- 1/4 cup cotton candy flavoring oil
- Pink and blue gel food coloring
- 2 1/2 cups all-purpose flour
- 1 tablespoon baking powder
- 1/2 teaspoon salt
- 1 cup granulated sugar
- 1/2 cup vegetable oil
- 4 large eggs
- 1 cup buttermilk
- 1 teaspoon clear vanilla extract
- 1/2 cup crushed, plain, store-bought cotton candy (for mixing into batter)
- Extra cotton candy for garnish
Instructions
- Preheat your oven to 350°F (175°C). Grease and flour three 8-inch round cake pans.
- In a large bowl, whisk together the flour, baking powder, and salt. Set aside.
- In a separate bowl, cream the softened butter and granulated sugar until light and fluffy. Beat in the vegetable oil. Add the eggs one at a time, mixing well after each addition.
- In a small bowl, mix the buttermilk and clear vanilla extract.
- Alternate adding the dry ingredients and the buttermilk mixture to the wet ingredients, beginning and ending with the dry ingredients. Mix until just combined. Do not overmix.
- Divide the batter evenly into three separate bowls. Stir the crushed cotton candy into the batter in one bowl. Add a few drops of pink gel coloring to the second bowl and blue gel coloring to the third bowl. Mix gently until the colors are uniform.
- Pour the white, pink, and blue batters into the prepared cake pans. Bake for 25 to 30 minutes, or until a toothpick inserted into the center comes out clean.
- Let the cakes cool in the pans for 10 minutes before inverting them onto a wire rack to cool completely.
- Prepare the frosting: Beat the softened butter until creamy. Gradually add the sifted powdered sugar, mixing until smooth. Beat in the heavy cream, vanilla extract, almond extract, and cotton candy flavoring oil until light and fluffy.
- Divide the frosting into three portions. Leave one portion white. Tint the second portion light pink and the third portion light blue using gel coloring.
- Place the white layer on your serving plate. Spread a thin layer of white frosting on top. Place the pink layer next, followed by blue. Frost the entire cake with the remaining white frosting.
- Use the remaining pink and blue frostings to create swirls or decorative borders on the top and sides of the cake for a pastel effect.
- Garnish the top of the cake with fresh, plain cotton candy just before serving.
Notes
- For the best cotton candy flavor, use a high-quality cotton candy flavoring oil.
- Assemble and decorate the cake shortly before serving, as the fresh cotton candy garnish will dissolve quickly.
- If you do not have buttermilk, mix 1 cup of milk with 1 tablespoon of white vinegar or lemon juice and let it sit for 5 minutes.
Nutrition
- Serving Size: 1 slice
- Calories: 450
- Sugar: 65
- Sodium: 250
- Fat: 20
- Saturated Fat: 10
- Unsaturated Fat: 8
- Trans Fat: 0.5
- Carbohydrates: 68
- Fiber: 1
- Protein: 4
- Cholesterol: 75